Subscription Groups
Engage Premier requires a Business tier account and includes Engage Foundations and Unify.
See the available plans, or contact Support.
Subscription groups let your users choose the emails they want to recieve from you. This page introduces subscription groups and explains how you can use them with Engage email campaigns.
About subscription groups
A subscription group lets you send email campaigns to specific groups of users. Subscription groups also give your customers the ability to manage their email preferences, ensuring they only get emails they want to receive.
For example, you may want to create a subscription group that will receive only promotional email campaigns. Should a customer decide to opt out of your promotional campaigns, they’ll still be able to receive email campaigns from other subscription groups you’ve created and to which they’ve subscribed.
What your users experience
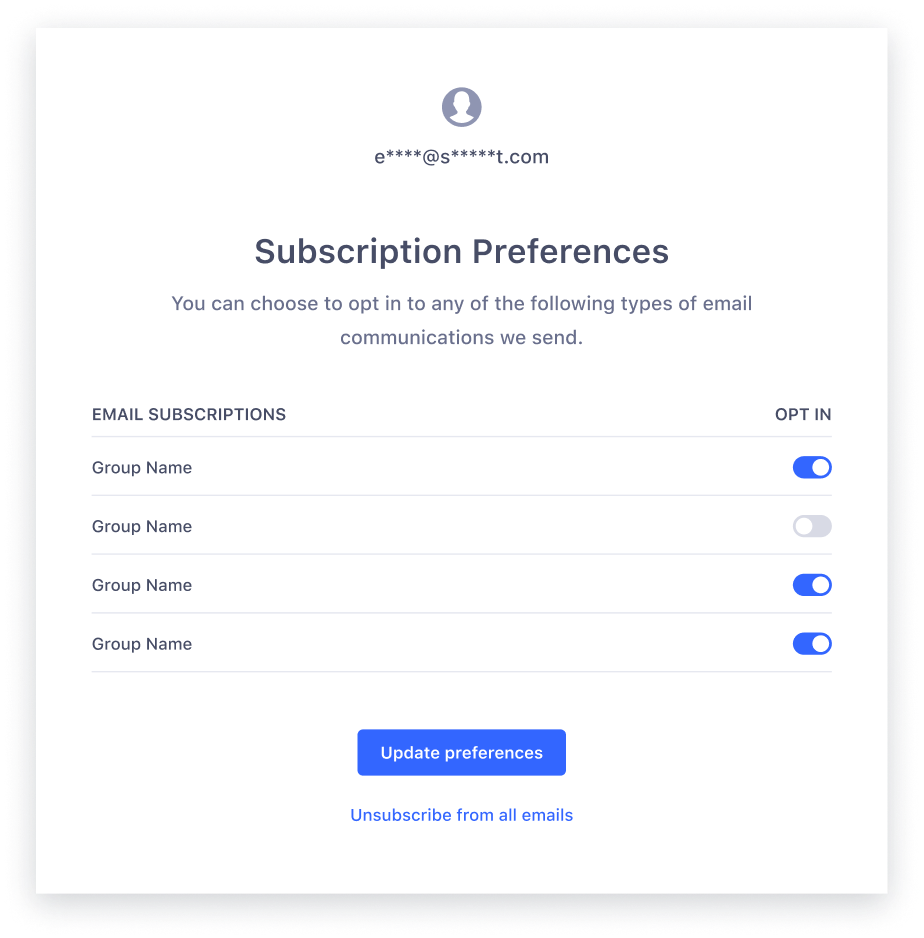
With subscription groups, your customers can opt in and out of groups on an individual basis instead of unsubscribing from all your campaigns.
Your customers will have the chance to opt in and out of subscription groups on both a subscription preferences page and on the landing page that launches when they unsubscribe.
Customers can access these pages through the unsubscribe and manage preference links that you include in your email templates.

Using subscription groups
To use a subscription group, you’ll need to first create the group, add subscribers, then create a new email template.
Create a subscription group
Follow these steps to create a subscription group:
- Navigate to Engage > Engage settings > Subscriptions.
- Click +Create subscription group.
- Add a name and description for the group, then click Next.
- (Optional:) Add subscribers to your group with a CSV file upload, then click Next.
- Review your new subscription group, then click Create Subscription Group.
Add group susbcribers
In addition to adding group subscribers when you first create a subscription group, you can also add subscribers to existing groups with a CSV file upload with these steps:
- Navigate to Engage > Engage settings > Subscriptions.
- From the Subscription groups table, select the more options icon, then click Add group subscribers.
- Download the template CSV file, then fill it out by entering email addresses and subscription groups. The subscription group should follow the format
[group_name]_subscription_status. - Upload the CSV file, then click Add Subscribers.
Create a new email template and send an email
To use subscription groups, you’ll need to create a new email template with new unsubscribe and manage preference links.
Once you’ve created a subscription group and added subscribers to it, follow these steps to send to the group:
- Build a new email template. The template should include both unsubscribe and manage preferences links. For more on special links, view Add unsubscribe links.
- During email setup, select the subscription group you want to send to from the Which subscription states should receive this message? dropdown, then finish setting up and publishing your campaign.
Set subscription group status with the Identify call
Segment supports subscription groups for email. You can send statuses for email subscription groups using the Identify call.
To set susbcription groups with the Identify call, you’ll need to include a key-value pair of "type": "EMAIL" and the groups object, like in the following sample payload:
{
  "userId": "12aBCDeFg4hIjKlM5OPq67RS8Tu",
  "context": {
    "messaging_subscriptions": [
      {
        "key": "(123) 555-5555",
        "type": "SMS",
        "status": "SUBSCRIBED" | "UNSUBSCRIBED" | "DID_NOT_SUBSCRIBE"
      },
      {
        "key": "(123) 555-5555",
        "type": "WhatsApp",
        "status": "SUBSCRIBED" | "UNSUBSCRIBED" | "DID_NOT_SUBSCRIBE"
      },
      {
        "key": "test@example.com",
        "type": "EMAIL",
        "status": "SUBSCRIBED" | "UNSUBSCRIBED" | "DID_NOT_SUBSCRIBE",
        "groups": [
            {
               "name": "newsletter",
               "status": "SUBSCRIBED" | "UNSUBSCRIBED" | "DID_NOT_SUBSCRIBE"
            },
            {
               "name": "marketing updates",
               "status": "SUBSCRIBED" | "UNSUBSCRIBED" | "DID_NOT_SUBSCRIBE"
            }
        ]
      }
    ],
    "externalIds": [
      {
        "id": "(123) 555-5555",
        "type": "phone",
        "collection": "users",
        "encoding": "none"
      }
    ],
    "traits": {
       "email": "test@example.com"
    }
  },
  "integrations": {},
  "traits": {}
}
Frequently asked questions
Your Engage space includes up to 25 subscription groups.
No. Templates you’ve previously created aren’t compatible with subscription groups. To use subscription groups, you’ll need to create new templates that include new unsubscribe and manage preference links.
If you delete a subscription group, Engage will still maintain the preferences of the group’s end users.
The Engage Events Source tracks four subscription group events: Email Unsubscribed, Email Group Unsubscribed, Channel Subscription Updated, and Group Subscription Updated.
If a user unsubscribes from all of your subscription groups, they’ll need to re-subscribe by explicitly opting back in to each group.
Yes. Test emails include fully functional unsubscribe and subscription preference links. If a test email recipient unsubscribes using a test email, Segment updates that user’s subscription state.
Test emails temporarily override an email subscription state. This means that an unsubscribed email address can receive a test email but won’t receive regular email campaigns from which they’ve unsubscribed.
Yes. Keep the following table in mind when you name a subscription group:
| Field | Convention |
|---|---|
| Group Name Character Limit | Limited to 75 characters, including spaces |
| Group Description Character Limit | Limited to 500 characters, including spaces |
| Spaces in Group Names | Spaces aren’t allowed at the beginning and/or end of the Group name |
| Unsupported characters for Group Names | !@#$%^&*()_+\-=\[\]{};':"\\|,.<>\/? |
| Unsupported accent characters for Group Names | á, é, í, ó, ú, à, è, ì, ò, ù, ë, ï, ã |
This page was last modified: 03 Oct 2023
Need support?
Questions? Problems? Need more info? Contact Segment Support for assistance!